PlantUML is an awesome way to document all your diagrams. Because with PlantUML and PlantText you can have text file that pin point exactly to an image you can document and keep documentation alive.
The project is opensource and you can find here an easy way to install it on a docker for your company or yourself.
Here is a step by step guide to install plantuml server with docker and to configure nginx as reverse proxy and make everything working together.
A link to an editable version of this document
First of all you need an appropriate docker image to start from.
Consider that everything will be in /var/www/plantuml/.
Simply create a docker file at /var/www/plantuml/Dockerfile that contains
FROM jetty:11-jre17-alpine

USER root

RUN apk update
RUN apk add --upgrade graphviz
Once it’s done save the file and in the same directory run:
sudo docker image build -t jetty:with-graphviz .
It should output something like this
[+] Building 3.8s (7/7) FINISHED
 => [internal] load build definition from Dockerfile                                          0.1s
 => => transferring dockerfile: 121B                                                          0.0s
 => [internal] load .dockerignore                                                             0.0s
 => => transferring context: 2B                                                               0.0s
 => [internal] load metadata for docker.io/library/jetty:11-jre17-alpine                      0.0s
 => CACHED [1/3] FROM docker.io/library/jetty:11-jre17-alpine                                 0.0s
 => [2/3] RUN apk update                                                                      1.4s
 => [3/3] RUN apk add --upgrade graphviz                                                      2.1s
 => exporting to image                                                                        0.3s
 => => exporting layers                                                                       0.3s
 => => writing image sha256:460c174a647c819101d3a5b02e2ef9350efdefb2e7e81fc8830da192fc1d2741  0.0s
 => => naming to docker.io/library/jetty:with-graphviz                                        0.0s
Creating the docker container
The image is ready and is named: jetty:with-graphviz not fancy but sufficient for what we need.
We will create a directory inside /var/www/plantuml/ called webapps. that will be the directory that will contains the WAR / JAR files. For Plantuml this is a WAR file.
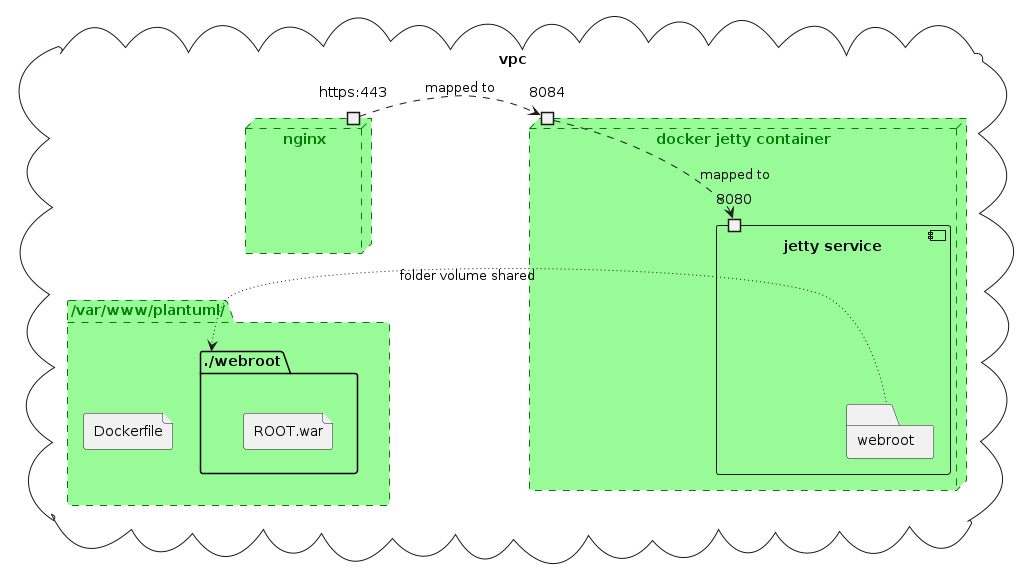
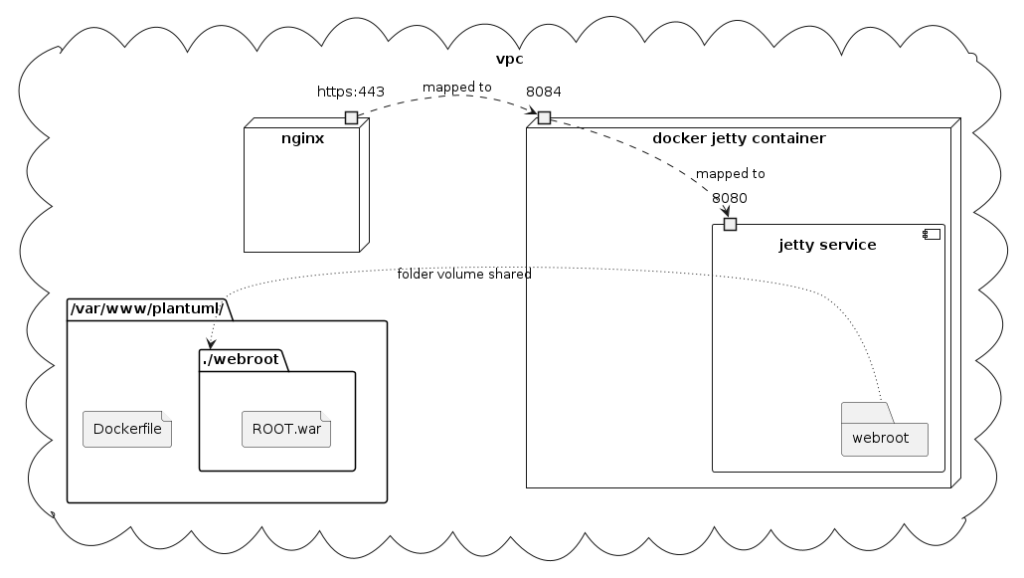
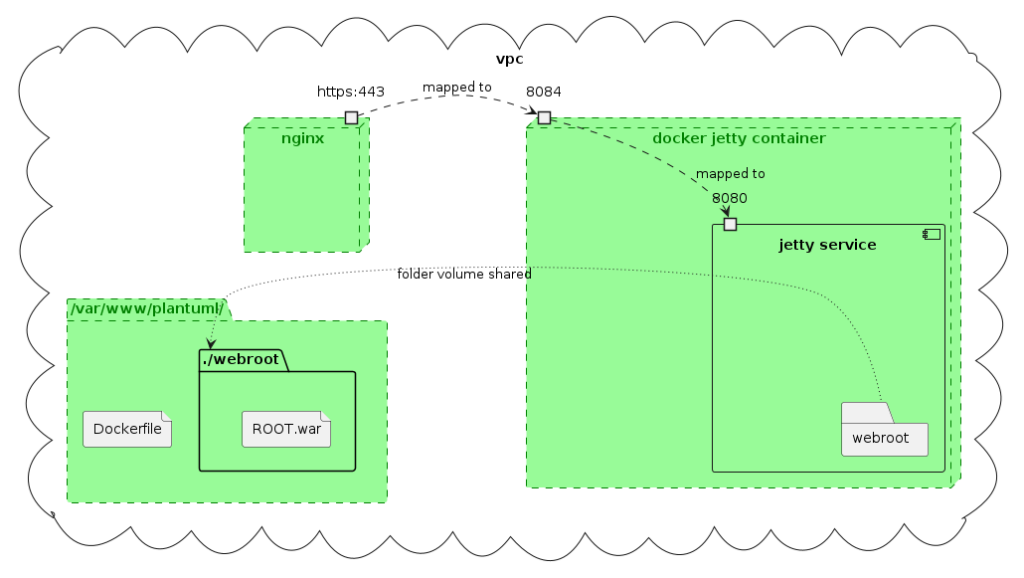
The docker will have access to the /var/www/plantuml/webapps folder and will open port 8084 and map it to the jetty service running on 8080. If you already have 8084 used for something else, feel free to change to 8085 or anything else available.
mkdir webapps
sudo docker create --name=plantuml -v /var/www/plantuml/webapps/:/var/lib/jetty/webapps -p 8084:8080/tcp --restart unless-stopped jetty:with-graphviz
sudo docker start plantuml
The docker container running jetty + graphviz is running and now we need to make it accessible from the web.

Configure Nginx
We will create a flow so that anyone reaching your server through http (and https) with the appropriate server_name will be pipe lined through the appropriate docker port running your container.
Create an generic java upstream for jetty
upstream jetty { server 127.0.0.1:8084 weight=100 max_fails=5 fail_timeout=5;}
Create a subdomain for JEE servlet
server {
    listen 443 ssl; # managed by Certbot
    listen [::]:443 ssl; # managed by Certbot

    listen 80;
    listen [::]:80;

    server_name plantuml.mycompany.example;

    access_log /var/log/nginx/plantuml.mycompany.example.access.log;
    error_log /var/log/nginx/plantuml.mycompany.example.error.log;

    # RSA certificate
    ssl_certificate /etc/letsencrypt/live/mycompany.example-0001/fullchain.pem; # managed by Certbot
    ssl_certificate_key /etc/letsencrypt/live/mycompany.example-0001/privkey.pem; # managed by Certbot

    include /etc/letsencrypt/options-ssl-nginx.conf; # managed by Certbot

    # Redirect non-https traffic to https
    if ($scheme != "https") {
    	return 301 https://$host$request_uri;
    } # managed by Certbot

    location / {
   	 proxy_set_header X-Forwarded-Host $host;
   	 proxy_set_header X-Forwarded-Server $host;
   	 proxy_pass http://jetty/;
   	 sub_filter '"http://jetty/'  '"/';
   	 sub_filter_once off;
    }
}
Test Nginx conf and Restart Nginx
sudo nginx -t && sudo systemctl restart nginx
Get plantuml.war at the right place with the appropriate right
Now that’s the very last step. You will simply put the plantuml WAR file in the jetty server webapps folder. And because we only serve plantuml with the jetty server: name it ROOT.
cd /var/www/plantuml/webapps/
wget http://sourceforge.net/projects/plantuml/files/plantuml.war/download
mv download ROOT.war
That’s it! You should now be able to reach https://plantuml.mycompany.example and enjoy!